CentOS 8 安装请移步 《CentOS 8 使用 Strongswan IPsec IKEv2 搭梯》
本文介绍使用 StrongSwan 搭建 VPN 的过程,适合有一定 linux 基础的用户。
本文使用的服务器
- 1CPU,1G, 优惠码
- CentOS 7.5
- StrongSwan 5.6.3
StrongSwan 简介
StrongSwan 是基于 OpenSource IPsec 的 VPN 解决方案,官方网站:https://www.strongswan.org/ ,如果无法访问请使用科学上网,原因你懂的。
StrongSwan 运行于 Linux 系统上,本文使用 CentOS 7 系统。
安装StrongSwan
由于基于源码自行编译安装过于繁琐,这里只介绍使用 yum 的安装方式。
首先,配置 StrongSwan 的源,此软件已包含在 EPEL 源中,关于配置 yum 源,请参考 《CentOS 7 配置 LNMP + FTP 环境》文中的 “添加常用软件源” 部分。
安装 StrongSwan
|
1 |
yum install strongswan |
启用开机启动
|
1 |
systemctl enable strongswan |
申请 ssl 证书
StrongSwan IPsec IKEv2 连接需要用到服务器证书,用于验证服务器身份。由于自签发证书不受操作系统信任,我们需要申请 Let’s Encrypt 免费证书。
申请方式参考《CentOS 7 Nginx Let’ s Encrypt SSL 证书安装配置》, 申请的域名必须是明确的,不能用通配符证书代替。例如,vpn.xxx.com, 申请证书时,必须带上 -d vpn.xxx.com 参数。
配置 StrongSwan
安装证书
假设上一步我们申请的证书保存在 /etc/letsencrypt/live/xxx.com 中,xxx.com 是你申请证书使用的域名。
我们使用创建软连接的方式使用证书
|
1 2 3 4 5 6 |
cd /etc/strongswan/ipsec.d ln -s /etc/letsencrypt/live/xxx.com/fullchain.pem ./certs/fullchain.pem ln -s /etc/letsencrypt/live/xxx.com/privkey.pem ./private/privkey.pem #下载 letsencrype 中间证书, 此步对于 windows 客户端连接至关重要。 wget https://letsencrypt.org/certs/lets-encrypt-r3-cross-signed.pem -O /etc/strongswan/ipsec.d/cacerts/lets-encrypt-x3-cross-signed.pem |
证书安装完成
修改 ipsec.conf 主配置文件
|
1 |
nano /etc/strongswan/ipsec.conf |
删除原有内容,写入已下内容
|
1 2 3 4 5 6 7 8 9 10 11 12 13 14 15 16 17 18 19 20 21 22 23 24 25 26 27 28 29 30 31 32 33 |
conn setup uniqueids = no conn %default compress = yes keyexchange=ike ike=aes256-sha256-sha1-modp2048-modp1024,3des-sha256-sha1-modp2048-modp1024! esp=aes256-sha256-sha1,3des-sha256-sha1! leftdns=8.8.8.8,8.8.4.4 rightdns=8.8.8.8,8.8.4.4 conn ikev2 dpdaction=clear dpddelay=60s rekey=no fragmentation=yes eap_identity=%identity left=%any leftid=这里用你申请证书时使用的域名,如“xxx.com” leftsubnet=0.0.0.0/0 leftauth=pubkey leftcert=fullchain.pem leftsendcert=always leftfirewall=yes right=%any rightid=%any rightsourceip=10.1.0.0/24 rightauth=eap-mschapv2 rightsendcert=never auto=add |
修改 charon.conf, 配置日志输出文件。
|
1 |
nano /etc/strongswan/strongswan.d/charon.conf |
日志不是必要项,建议只用在调试配置时使用,配置正常后注释掉 filelog 节部分。
|
1 2 3 4 5 6 7 8 9 10 11 12 13 14 15 16 17 18 |
charon { filelog { charon-debug-log { path = /var/log/charon_debug.log time_format = %b %e %T default = 2 mgr = 0 net = 1 enc = 1 asn = 1 job = 1 ike_name = yes append = no flush_line = yes } } #这里是其它设置...... } |
修改 ipsec.secrets , 增加 vpn 账户。
|
1 |
nano /etc/strongswan/ipsec.secrets |
添加服务端证书私钥,新建用户账号。
|
1 2 3 4 5 |
#这是申请的证书的私钥 : RSA privkey.pem #这是用户账号,每行一个账号,格式为 [账号 %any : EAP "密码"] user1 %any : EAP "password1" user2 %any : EAP "password2" |
开启内核转发
|
1 |
nano /etc/sysctl.conf |
增加下面的内容
|
1 2 3 4 5 |
# VPN net.ipv4.ip_forward = 1 net.ipv4.conf.all.accept_redirects = 0 net.ipv4.conf.all.send_redirects = 0 net.ipv6.conf.all.forwarding=1 |
重新加载规则
|
1 |
sysctl -p |
配置防火墙
CentOS 7 默认使用 firewalld 防火墙, 有关 firewalld 的介绍请看这里。
允许 ‘AH’ 和 ‘ESP’ 身份验证协议和加密协议通过防火墙
|
1 2 |
firewall-cmd --zone=public --permanent --add-rich-rule='rule protocol value="esp" accept' firewall-cmd --zone=public --permanent --add-rich-rule='rule protocol value="ah" accept' |
开放 ipsec 和相关端口
|
1 2 3 |
firewall-cmd --zone=public --permanent --add-port=500/udp firewall-cmd --zone=public --permanent --add-port=4500/udp firewall-cmd --zone=public --permanent --add-service="ipsec" |
允许 ip 伪装
|
1 |
firewall-cmd --zone=public --permanent --add-masquerade |
然后重新加载防火墙
|
1 |
firewall-cmd --reload |
如果 vps 配置较低,内存有限,可以使用 iptables 替换 firewalld 防火墙。
首先禁用 firewalld
|
1 2 |
systemctl stop firewalld systemctl disable firewalld |
然后安装 iptables
|
1 2 |
yum install iptables-services systemctl enable iptables |
配置 iptables
|
1 |
nano /etc/sysconfig/iptables |
在默认内容基础上,添加几条规则(下面高亮的部分)。
|
1 2 3 4 5 6 7 8 9 10 11 12 13 14 15 16 17 18 19 20 21 22 23 24 25 |
*nat :PREROUTING ACCEPT [0:0] :INPUT ACCEPT [0:0] :OUTPUT ACCEPT [0:0] :POSTROUTING ACCEPT [0:0] -A POSTROUTING -m policy --pol ipsec --dir out -j ACCEPT -A POSTROUTING -s 10.1.0.0/24 -o eth0 -j MASQUERADE COMMIT *filter :INPUT ACCEPT [0:0] :FORWARD ACCEPT [0:0] :OUTPUT ACCEPT [0:0] -A INPUT -m state --state RELATED,ESTABLISHED -j ACCEPT -A INPUT -p icmp -j ACCEPT -A INPUT -i lo -j ACCEPT -A INPUT -i eth0 -j ACCEPT -A INPUT -p tcp -m state --state NEW -m tcp --dport 22 -j ACCEPT -A INPUT -p ah -j ACCEPT -A INPUT -p esp -j ACCEPT -A INPUT -p udp -m udp --dport 500 -j ACCEPT -A INPUT -p udp -m udp --dport 4500 -j ACCEPT -A INPUT -j REJECT --reject-with icmp-host-prohibited -A FORWARD -i eth0 -m policy --pol ipsec --dir in -j ACCEPT -A FORWARD -j REJECT --reject-with icmp-host-prohibited COMMIT |
重新加载 iptables 规则
|
1 |
systemctl restart iptables |
启动 StrongSwan 服务
|
1 |
systemctl restart strongswan |
配置客户端
windows 10
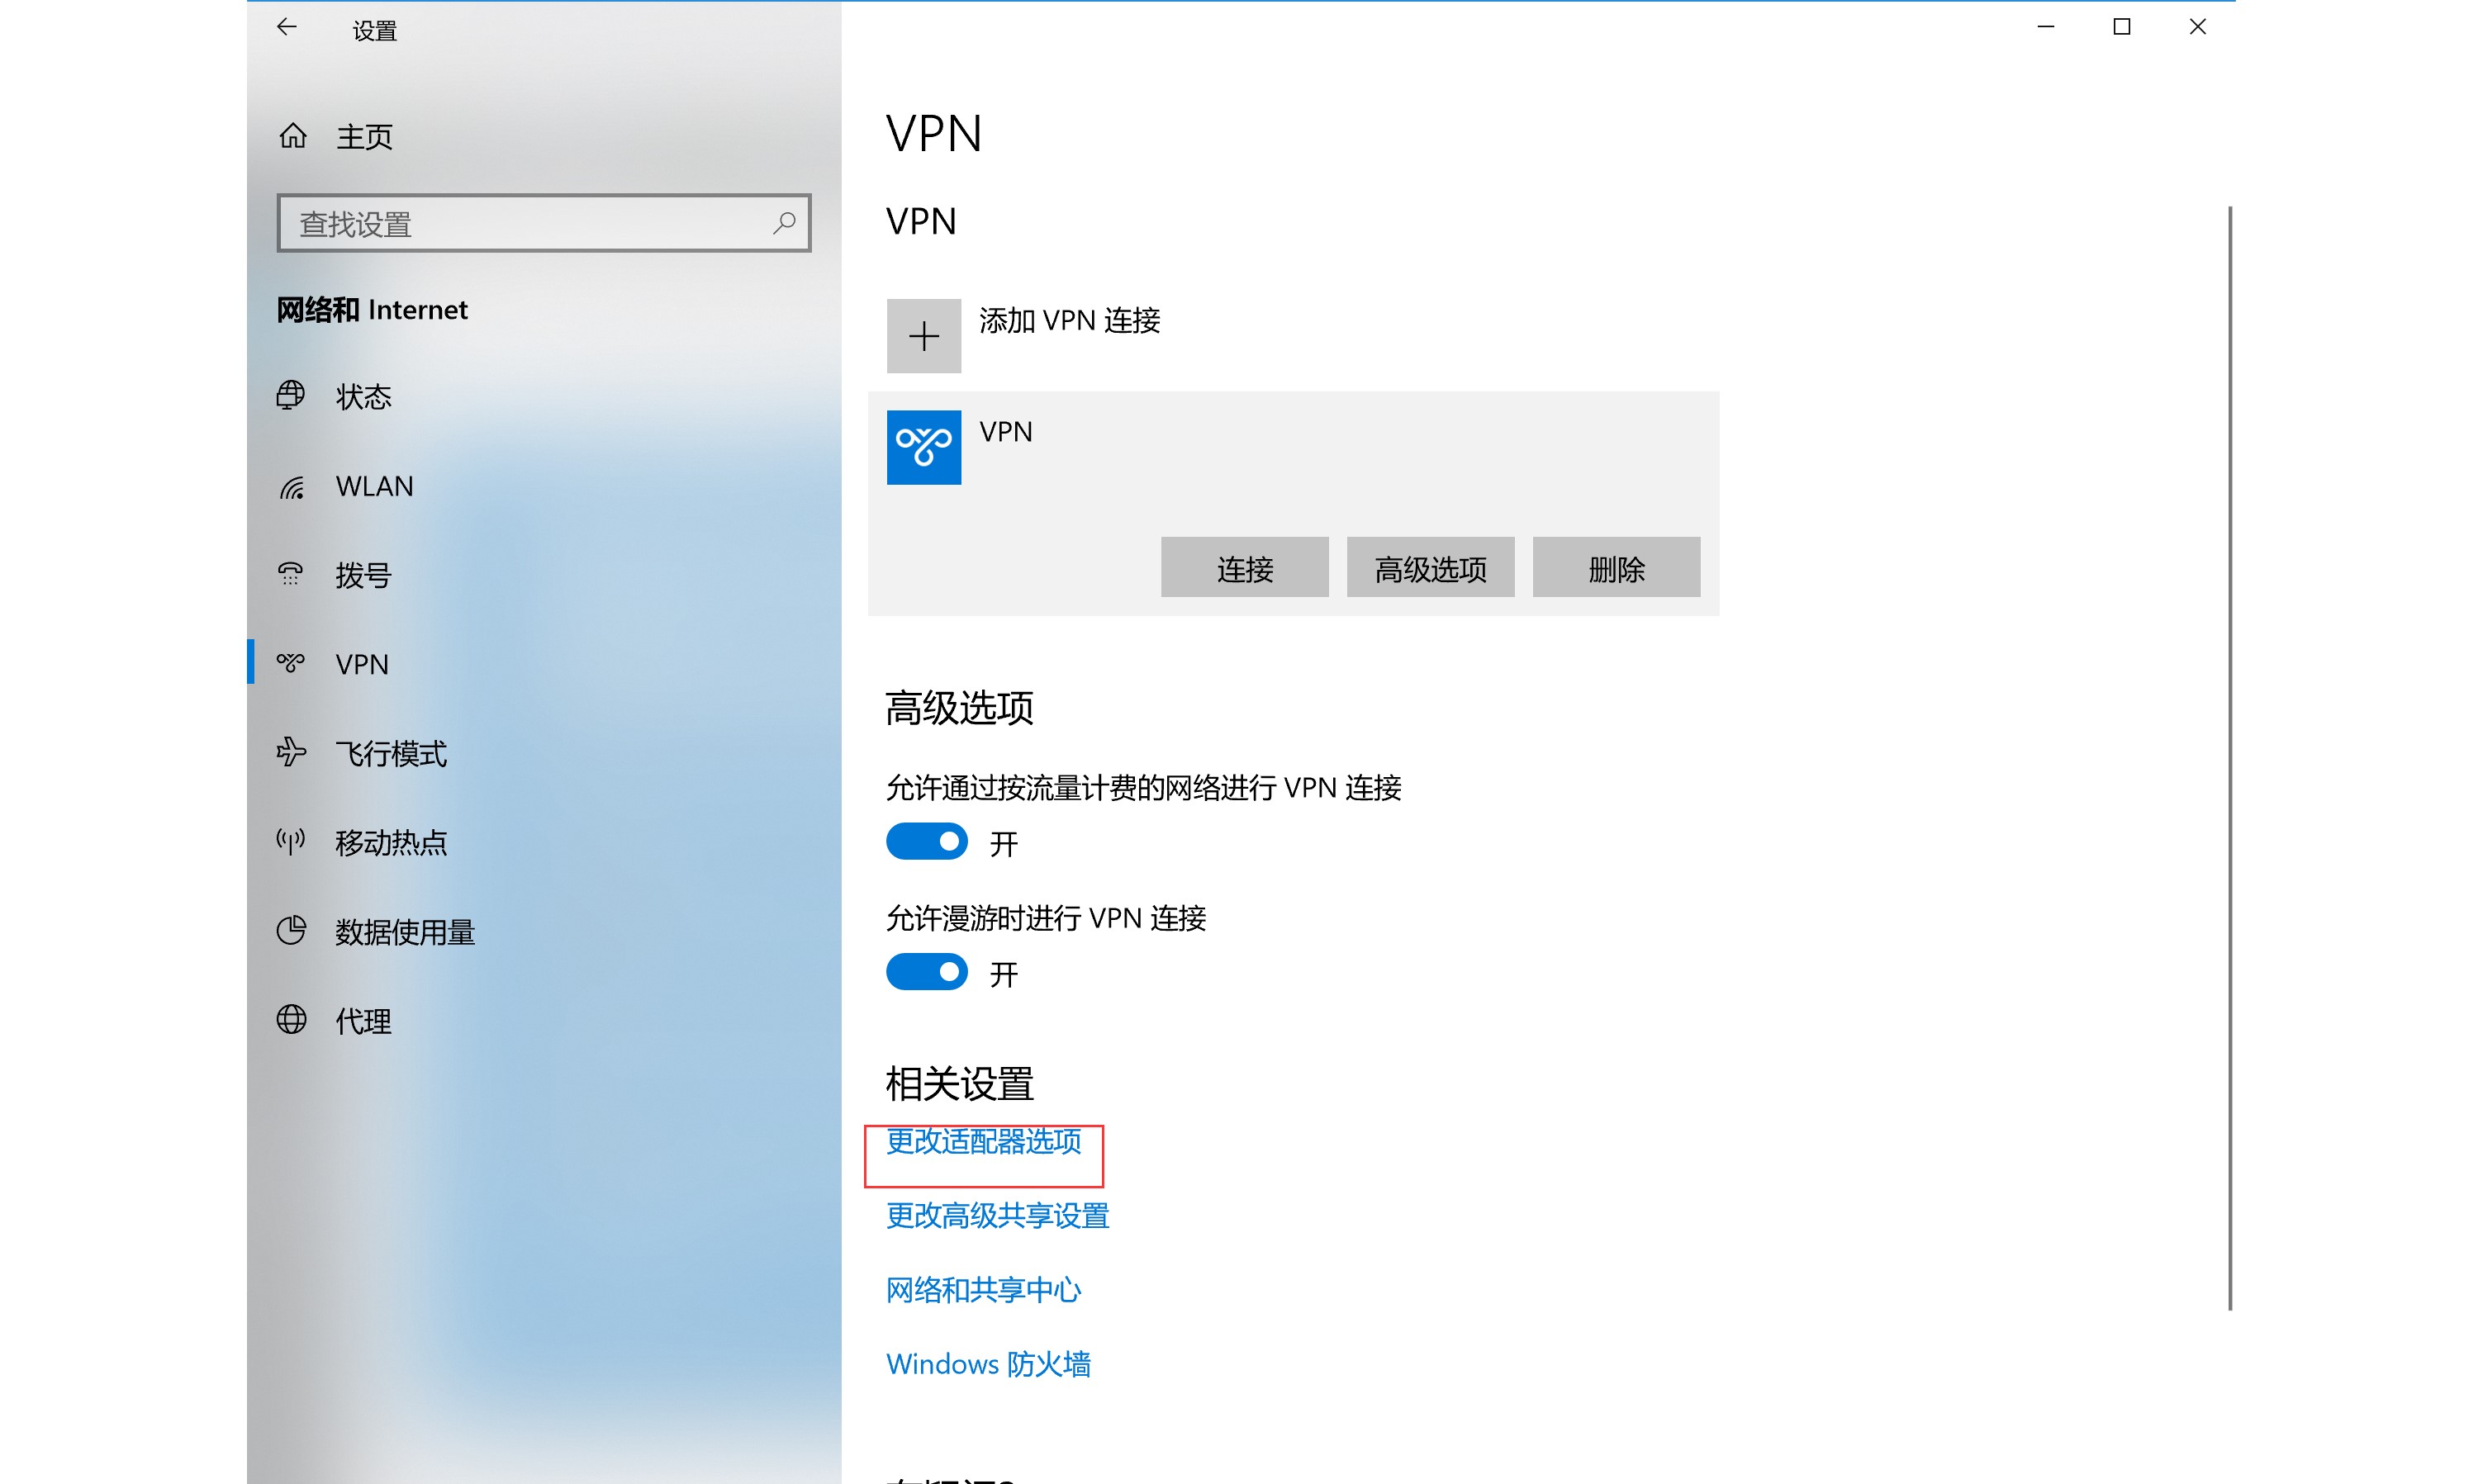
开始->设置->网络和Internet->vpn->添加vpn连接

添加完成后点击“更改适配器选项”

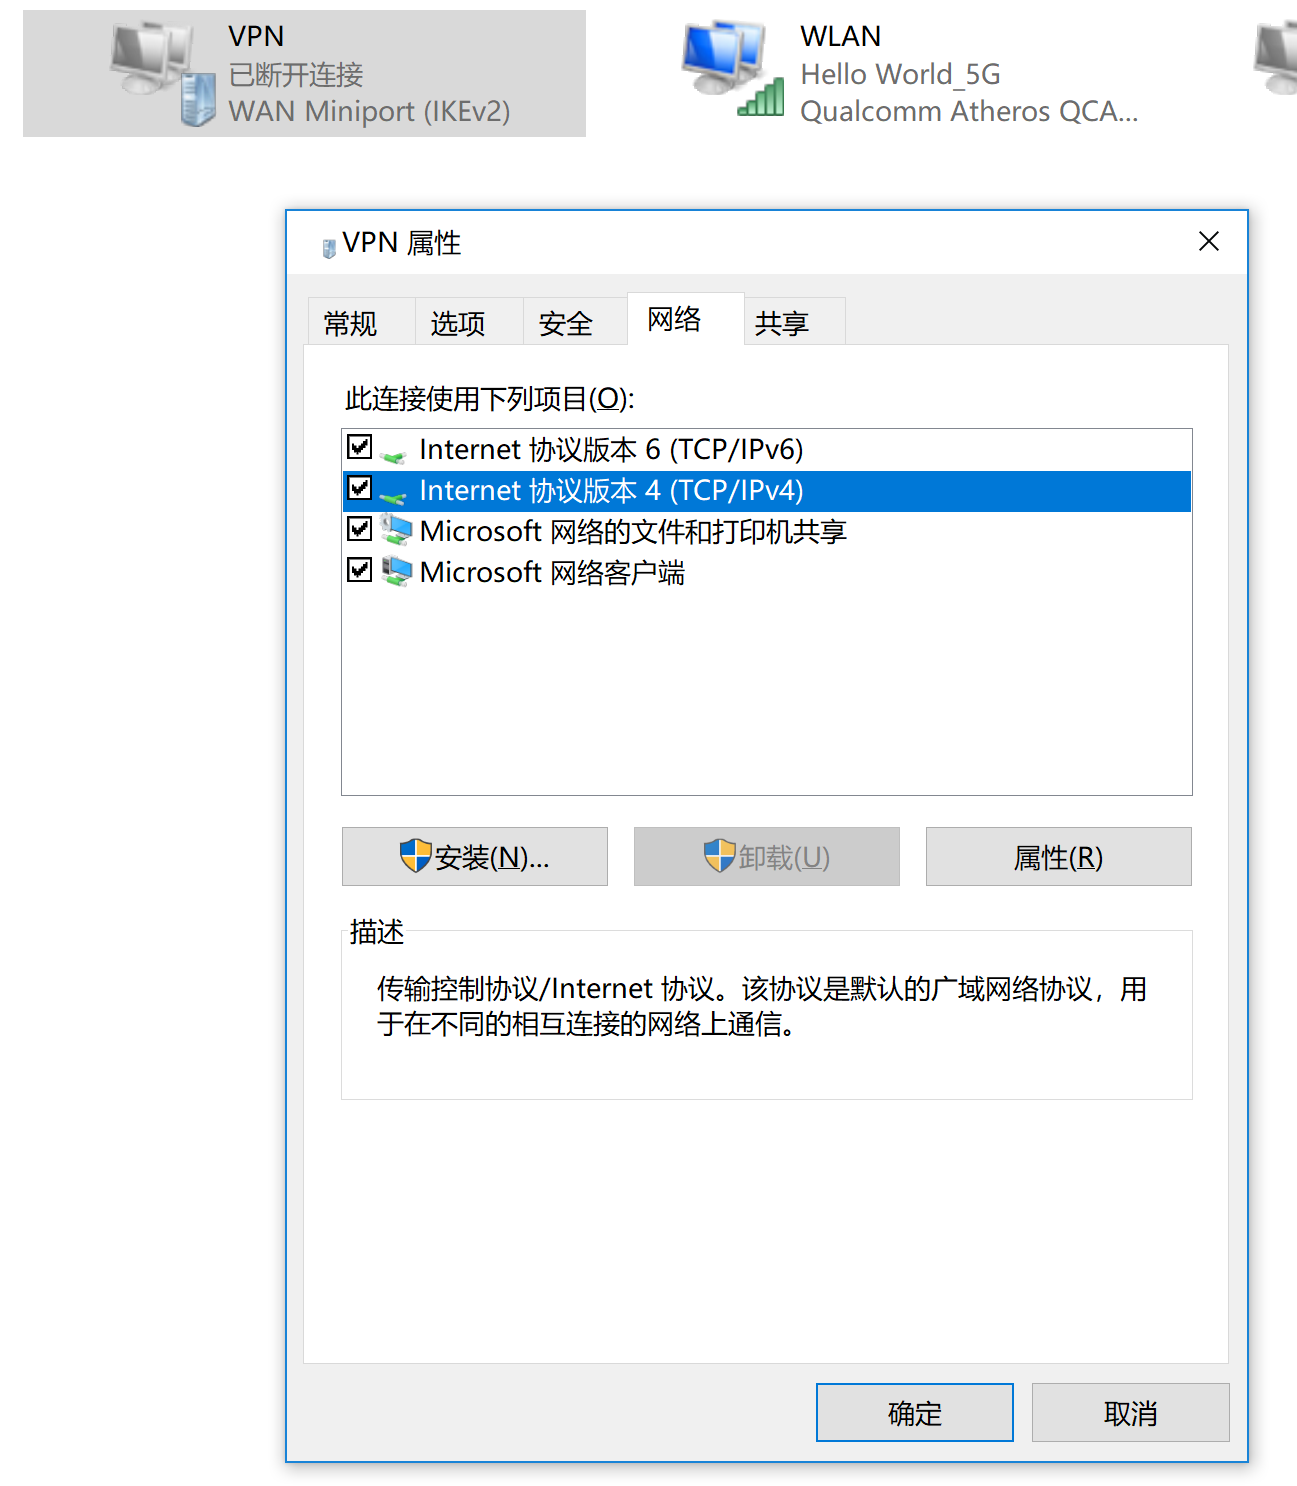
在vpn连接项点右键,属性->网络

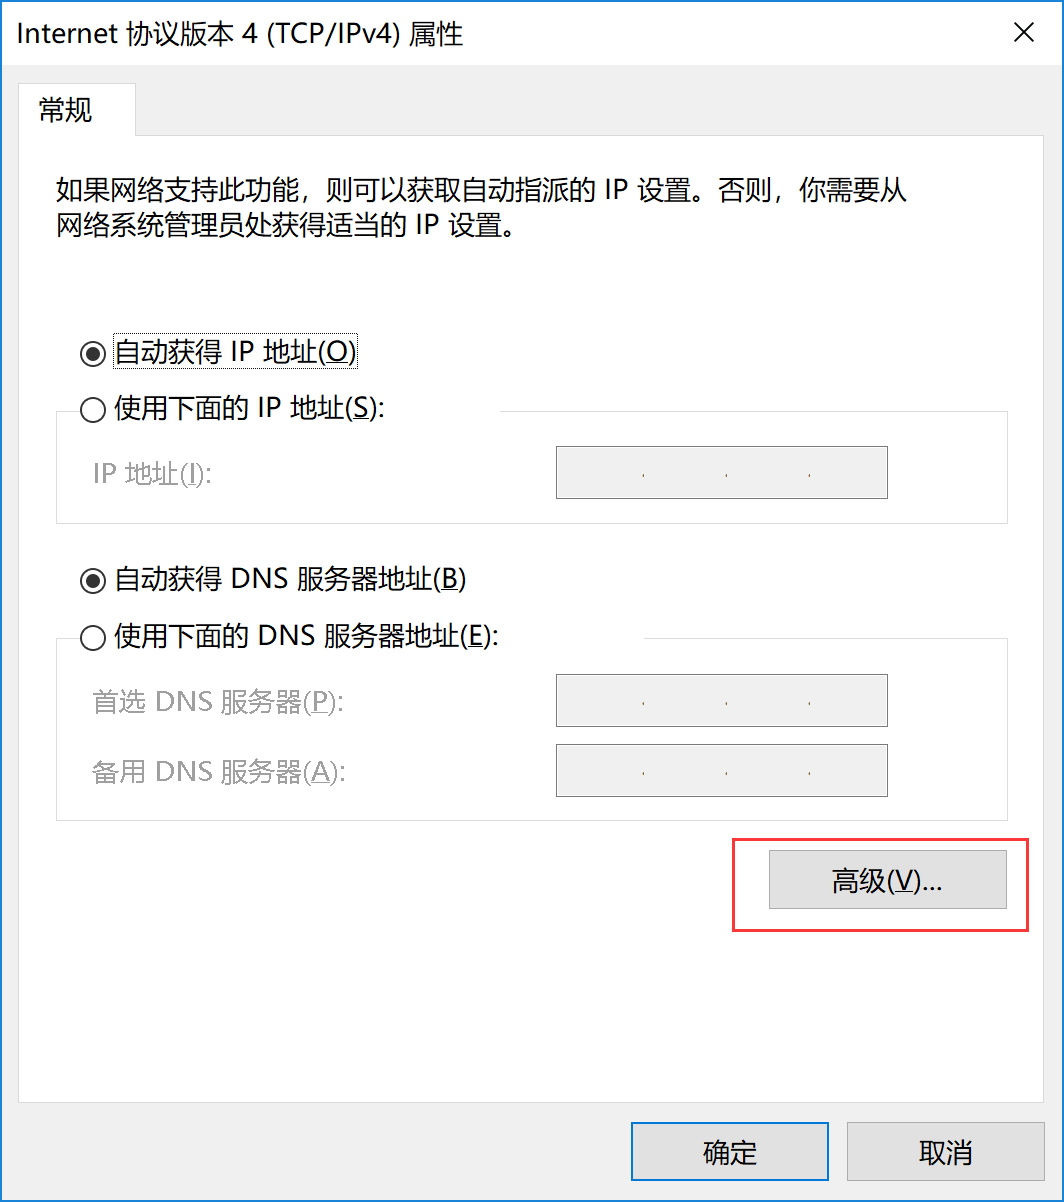
双击 ipv4 ,点击“高级”

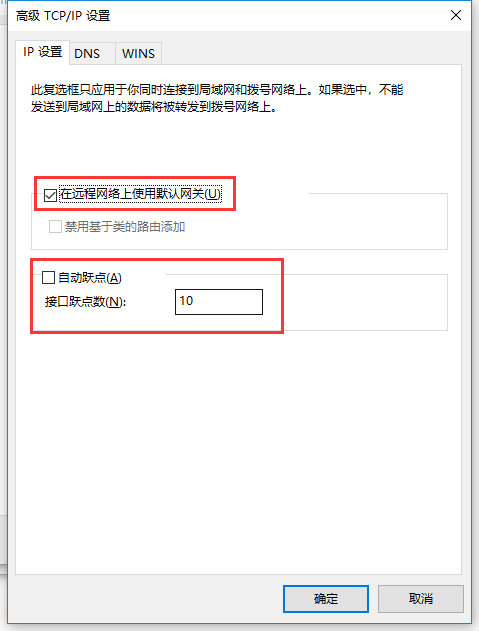
勾选“在远程网络上使用默认网关”, 取消“自动跃点”,手动填写跃点数为“10”(当自动跃点无法上网时才设置手动跃点)。如何确定跃点数,请看下面内容。

确定后连接 vpn 即可。
确定跃点数
因为 win10 系统的问题,经常会出现vpn连接能连上,就是打不开网页的情况,这是因为“本地连接”的优先级高于“vpn”的优先级,导致所有的请求优先使用“本地连接”的dns去解析域名,由于我们国家坚持推行使用社会主义特色的dns,所以某些域名解析会返回无效或错误的ip地址,这就导致我们无法正常访问网站!跃点数就是设定优先级用的。
我们需要做的就是让 “vpn 连接” 的跃点数小于 “本地连接” 的跃点数。
断开vpn, 打开 PowerShell 窗口,输入下面命令。
|
1 2 |
#查看接口 Get-NetIPInterface -AddressFamily ipv4 |
第一列表示当前接口的索引号,第二列是名称,InterfaceMetric 列即接口的跃点,我的本地连接名是 WLAN, 跃点是35。

查看“本地连接”网卡的跃点数为 35,因此上一步中设置的跃点数只要小于35即可(跃点数越小优先级越高),所以我们设置为10。
IOS
“设置->VPN->添加配置”, 选 IKEv2
描述: 随便填
服务器: 填url或ip
远程ID: ipsec.conf 中的 leftid, 如 “xxx.com”
用户鉴定: 用户名
用户名: EAP 项用户名, 如 “user1”
密码: EAP 项密码, 如 “password1”
MAC
原理同 ios, 我没有 mac 做验证。
Android
需下载安装客户端程序,前往官网下载最新版 apk 程序。

ike=aes256-sha256-modp2048,3des-sha1-modp2048,aes256-sha1-modp2048!
esp=aes256-sha256,3des-sha1,aes256-sha1!
原来的加密会导致8分钟左右断线,修改为这个就完美了。
多次尝试安装,用您的方法成功了,非常感谢!
终于找到个乐于助人的博主了,先马克有问题再来请教!
弄好了,多谢
连接上了,但不能上网
android 的可能和系统版本有关系,不同的版本支持的加密类型不同,你可以查一下你的版本支持的加密类型,把它加到ike和esp里。
你好,我现在启动strongswan都正常,但是在客户端建立连接时失败,烦请帮忙看看什么问题,不胜感激~下面是日志:
Dec 10 15:37:58 07[CFG] received stroke: add connection ‘ikev2’
Dec 10 15:37:58 07[CFG] adding virtual IP address pool 10.99.1.0/24
Dec 10 15:37:58 07[CFG] loaded certificate “CN=vpn.ilinklink.com” from ‘fullchain.pem’
Dec 10 15:37:58 07[CFG] added configuration ‘ikev2’
Dec 10 15:38:24 13[NET] received packet: from xxx.xxx.xxx.xxx[500] to xxx.xxx.xxx.xxx[500] (604 bytes)
Dec 10 15:38:24 13[ENC] parsed IKE_SA_INIT request 0 [ SA KE No N(REDIR_SUP) N(NATD_S_IP) N(NATD_D_IP) N(FRAG_SUP) ]
Dec 10 15:38:24 13[IKE] xxx.xxx.xxx.xxx is initiating an IKE_SA
Dec 10 15:38:24 13[IKE] remote host is behind NAT
Dec 10 15:38:24 13[ENC] generating IKE_SA_INIT response 0 [ SA KE No N(NATD_S_IP) N(NATD_D_IP) N(FRAG_SUP) N(MULT_AUTH) ]
Dec 10 15:38:24 13[NET] sending packet: from xxx.xxx.xxx.xxx[500] to xxx.xxx.xxx.xxx[500] (448 bytes)
Dec 10 15:38:27 09[NET] received packet: from xxx.xxx.xxx.xxx[500] to xxx.xxx.xxx.xxx[500] (604 bytes)
Dec 10 15:38:27 09[ENC] parsed IKE_SA_INIT request 0 [ SA KE No N(REDIR_SUP) N(NATD_S_IP) N(NATD_D_IP) N(FRAG_SUP) ]
Dec 10 15:38:27 09[IKE] received retransmit of request with ID 0, retransmitting response
Dec 10 15:38:27 09[NET] sending packet: from 4xxx.xxx.xxx.xxx[500] to xxx.xxx.xxx.xxx[500] (448 bytes)
Dec 10 15:38:30 14[NET] received packet: from xxx.xxx.xxx.xxx[500] to xxx.xxx.xxx.xxx[500] (604 bytes)
Dec 10 15:38:30 14[ENC] parsed IKE_SA_INIT request 0 [ SA KE No N(REDIR_SUP) N(NATD_S_IP) N(NATD_D_IP) N(FRAG_SUP) ]
Dec 10 15:38:30 14[IKE] received retransmit of request with ID 0, retransmitting response
Dec 10 15:38:30 14[NET] sending packet: from xxx.xxx.xxx.xxx[500] to xxx.xxx.xxx.xxx[500] (448 bytes)
Dec 10 15:38:33 08[NET] received packet: from xxx.xxx.xxx.xxx[500] to xxx.xxx.xxx.xxx[500] (604 bytes)
Dec 10 15:38:33 08[ENC] parsed IKE_SA_INIT request 0 [ SA KE No N(REDIR_SUP) N(NATD_S_IP) N(NATD_D_IP) N(FRAG_SUP) ]
Dec 10 15:38:33 08[IKE] received retransmit of request with ID 0, retransmitting response
你好,服务器搭好后win10和android手机都显示已连接,可是无法访问网页,请问有什么排查方向吗?谢谢
内核转发,防火墙转发,dns, 还有确保服务器本身可以访问“外网”。想确定具体原因就看日志。
内核防火墙转发根据教程来的,应该没有问题吧,服务器肯定能连外网。日志里只有建立tunnel时的信息。怀疑是dns的问题。下面是一些信息:
# iptables -nL
Chain INPUT (policy ACCEPT)
target prot opt source destination
ACCEPT all — 0.0.0.0/0 0.0.0.0/0 state RELATED,ESTABLISHED
ACCEPT icmp — 0.0.0.0/0 0.0.0.0/0
ACCEPT all — 0.0.0.0/0 0.0.0.0/0
ACCEPT tcp — 0.0.0.0/0 0.0.0.0/0 state NEW tcp dpt:22
ACCEPT ah — 0.0.0.0/0 0.0.0.0/0
ACCEPT esp — 0.0.0.0/0 0.0.0.0/0
ACCEPT udp — 0.0.0.0/0 0.0.0.0/0 udp dpt:500
ACCEPT udp — 0.0.0.0/0 0.0.0.0/0 udp dpt:4500
REJECT all — 0.0.0.0/0 0.0.0.0/0 reject-with icmp-host-prohibited
Chain FORWARD (policy ACCEPT)
target prot opt source destination
ACCEPT all — 0.0.0.0/0 0.0.0.0/0 policy match dir in pol ipsec
REJECT all — 0.0.0.0/0 0.0.0.0/0 reject-with icmp-host-prohibited
Chain OUTPUT (policy ACCEPT)
target prot opt source destination
# iptables -t nat -nL
Chain PREROUTING (policy ACCEPT)
target prot opt source destination
Chain INPUT (policy ACCEPT)
target prot opt source destination
Chain OUTPUT (policy ACCEPT)
target prot opt source destination
Chain POSTROUTING (policy ACCEPT)
target prot opt source destination
ACCEPT all — 0.0.0.0/0 0.0.0.0/0 policy match dir out pol ipsec
MASQUERADE all — 10.1.0.0/24 0.0.0.0/0
# cat /etc/sysctl.conf
net.ipv6.conf.all.disable_ipv6 = 1
net.ipv6.conf.default.disable_ipv6 = 1
net.ipv6.conf.lo.disable_ipv6 = 1
vm.swappiness = 0
net.ipv4.neigh.default.gc_stale_time=120
net.ipv4.conf.all.rp_filter=0
net.ipv4.conf.default.rp_filter=0
net.ipv4.conf.default.arp_announce = 2
net.ipv4.conf.lo.arp_announce=2
net.ipv4.conf.all.arp_announce=2
net.ipv4.tcp_max_tw_buckets = 5000
net.ipv4.tcp_syncookies = 1
net.ipv4.tcp_max_syn_backlog = 1024
net.ipv4.tcp_synack_retries = 2
net.ipv4.ip_forward = 1
net.ipv4.conf.all.accept_redirects = 0
net.ipv4.conf.all.send_redirects = 0
net.ipv6.conf.all.forwarding=1
抓了一下ipsec0的包,发现一直出错,错误如下:
# tcpdump -i ipsec0 -vvv -n
tcpdump: listening on ipsec0, link-type RAW (Raw IP), capture size 262144 bytes
09:38:01.580894 IP (tos 0x0, ttl 64, id 47089, offset 0, flags [DF], proto TCP (6), length 60)
10.1.0.1.45184 > 106.11.186.53.http: Flags [S], cksum 0xcdbd (correct), seq 3774583306, win 65535, options [mss 1360,sackOK,TS val 43066875 ecr 0,nop,wscale 8], length 0
09:38:01.580941 IP (tos 0xc0, ttl 64, id 24224, offset 0, flags [none], proto ICMP (1), length 88)
172.20.136.173 > 10.1.0.1: ICMP host 106.11.186.53 unreachable – admin prohibited, length 68
IP (tos 0x0, ttl 63, id 47089, offset 0, flags [DF], proto TCP (6), length 60)
10.1.0.1.45184 > 106.11.186.53.http: Flags [S], cksum 0xcdbd (correct), seq 3774583306, win 65535, options [mss 1360,sackOK,TS val 43066875 ecr 0,nop,wscale 8], length 0
09:38:01.626734 IP (tos 0x0, ttl 64, id 39556, offset 0, flags [DF], proto UDP (17), length 66)
10.1.0.1.36063 > 8.8.8.8.domain: [udp sum ok] 48911+ AAAA? connect.rom.miui.com. (38)
09:38:01.626758 IP (tos 0xc0, ttl 64, id 24259, offset 0, flags [none], proto ICMP (1), length 94)
172.20.136.173 > 10.1.0.1: ICMP host 8.8.8.8 unreachable – admin prohibited, length 74
IP (tos 0x0, ttl 63, id 39556, offset 0, flags [DF], proto UDP (17), length 66)
10.1.0.1.36063 > 8.8.8.8.domain: [udp sum ok] 48911+ AAAA? connect.rom.miui.com. (38)
09:38:01.653729 IP (tos 0x0, ttl 64, id 30625, offset 0, flags [DF], proto TCP (6), length 60)
10.1.0.1.36156 > 120.92.98.14.xmpp-client: Flags [S], cksum 0x1e57 (correct), seq 700928419, win 65535, options [mss 1360,sackOK,TS val 43066882 ecr 0,nop,wscale 8], length 0
09:38:01.653749 IP (tos 0xc0, ttl 64, id 24270, offset 0, flags [none], proto ICMP (1), length 88)
172.20.136.173 > 10.1.0.1: ICMP host 120.92.98.14 unreachable – admin prohibited, length 68
IP (tos 0x0, ttl 63, id 30625, offset 0, flags [DF], proto TCP (6), length 60)
10.1.0.1.36156 > 120.92.98.14.xmpp-client: Flags [S], cksum 0x1e57 (correct), seq 700928419, win 65535, options [mss 1360,sackOK,TS val 43066882 ecr 0,nop,wscale 8], length 0
09:38:01.770704 IP (tos 0x0, ttl 64, id 850, offset 0, flags [DF], proto TCP (6), length 60)
10.1.0.1.33932 > 106.11.186.53.https: Flags [S], cksum 0x4ce5 (correct), seq 4177012060, win 65535, options [mss 1360,sackOK,TS val 43066894 ecr 0,nop,wscale 8], length 0
09:38:01.770726 IP (tos 0xc0, ttl 64, id 24294, offset 0, flags [none], proto ICMP (1), length 88)
172.20.136.173 > 10.1.0.1: ICMP host 106.11.186.53 unreachable – admin prohibited, length 68
IP (tos 0x0, ttl 63, id 850, offset 0, flags [DF], proto TCP (6), length 60)
10.1.0.1.33932 > 106.11.186.53.https: Flags [S], cksum 0x4ce5 (correct), seq 4177012060, win 65535, options [mss 1360,sackOK,TS val 43066894 ecr 0,nop,wscale 8], length 0
09:38:01.811018 IP (tos 0x0, ttl 64, id 16885, offset 0, flags [DF], proto UDP (17), length 66)
10.1.0.1.first-defense > 8.8.4.4.domain: [udp sum ok] 48911+ AAAA? connect.rom.miui.com. (38)
09:38:01.811035 IP (tos 0xc0, ttl 64, id 24299, offset 0, flags [none], proto ICMP (1), length 94)
172.20.136.173 > 10.1.0.1: ICMP host 8.8.4.4 unreachable – admin prohibited, length 74
IP (tos 0x0, ttl 63, id 16885, offset 0, flags [DF], proto UDP (17), length 66)
10.1.0.1.first-defense > 8.8.4.4.domain: [udp sum ok] 48911+ AAAA? connect.rom.miui.com. (38)
你用国内服务器搭梯子?
阿里云的硅谷机房
检查一下 charon.log 日志的内容,那个比较详细。
问题找到了,iptables filter 表的FORWARD链中拒绝了icmp,下面的第二条。删掉就好了。
Chain FORWARD (policy ACCEPT)
target prot opt source destination
ACCEPT all — 0.0.0.0/0 0.0.0.0/0 policy match dir in pol ipsec
REJECT all — 0.0.0.0/0 0.0.0.0/0 reject-with icmp-host-prohibited
你可以试试这么写
-A FORWARD -m state –state RELATED,ESTABLISHED -j ACCEPT
-A FORWARD -s 10.1.0.0/24 -o eth0 -j ACCEPT
-A FORWARD -j REJECT –reject-with icmp-host-prohibited
大哥 在吗 strongswan客户端连接VPN连接不上 启动时报错
initiating IKE_SA myvpn[1] to 123.125.247.90
generating IKE_SA_INIT request 0 [ SA KE No N(NATD_S_IP) N(NATD_D_IP) N(HASH_ALG) N(REDIR_SUP) ]
sending packet: from 192.168.71.131 [500] to 123.125.247.90 [500] (1388 bytes)
received packet: from 123.125.247.90 [500] to 192.168.71.131 [500] (580 bytes)
parsed IKE_SA_INIT response 0 [ SA KE No V N(NATD_S_IP) N(NATD_D_IP) ]
received unknown vendor ID: 48:55:41:57:45:49:2d:49:4b:45:76:31:44:53:43:50
local host is behind NAT, sending keep alives
no IDi configured, fall back on IP address
authentication of ‘192.168.71.131 ‘ (myself) with pre-shared key
no shared key found for ‘192.168.71.131
‘ – ’48:55:41:57:45:49:2d:49:4b:45:76:31:44:53:43:50’
establishing connection ‘myvpn’ failed
没有找到共享密钥,看看 ipsec.secrets 文件里的密码设置的对不对。记得重启服务。
使用letsencrypt ios/mac均可以以eap用户密码登录。但是Android和WIN10不能连接。
win10客户端写的已经很详细了,配置的都对是没问题的。
win10 正常,但ios12总是提示用户认证失败
看下你的账号密码,leftId 等等是否正确,还有证书是否配置正确及有效。
我的用ios12很正常。
如果你的win10和ios 是同一个账号,那可能不能同时登录 ,重启strongswan服务后在ios上单独登录试试。