本文介绍使用 StrongSwan 搭建 VPN 的过程,适合有一定 linux 基础的用户。
本文使用的服务器
- 1CPU,1G, 优惠码
- CentOS 8.3
- StrongSwan 5.8.2
StrongSwan 简介
StrongSwan 是基于 OpenSource IPsec 的 VPN 解决方案,官方网站:https://www.strongswan.org/ ,如果无法访问请使用科学上网,原因你懂的。
本文介绍使用 StrongSwan 搭建 VPN 的过程,适合有一定 linux 基础的用户。
StrongSwan 是基于 OpenSource IPsec 的 VPN 解决方案,官方网站:https://www.strongswan.org/ ,如果无法访问请使用科学上网,原因你懂的。
1 2 3 4 5 6 7 8 | #下载安装脚本 wget https://raw.githubusercontent.com/Angristan/OpenVPN-install/master/openvpn-install.sh #给脚本增加可执行权限 chmod +x openvpn-install.sh #运行脚本安装 ./openvpn-install.sh |
想要更多?没了!就是这么简单。
安装过程需要用户选择多次选择设置项。按提示输入序号就可以。 具体说明请看 这里
如果你同我一样需要在路由器上连接 OpenVPN 服务端,可能会遇到一些问题,最典型的就是客户端的版本过低,服务端不支持。例如我的华硕路由器的 OpenVPN 客户端是 2.3.2 版本的,上面安装的服务端加密方式要求最低版本为2.4。
要解决这个问题,只需修改几项配置即可。
修改服务端配置
1 | nano /etc/openvpn/server.conf |
1 2 3 4 5 6 7 8 9 10 11 12 13 14 15 16 17 18 19 20 21 22 23 24 25 26 | port 1194 proto udp dev tun user nobody group nobody persist-key persist-tun keepalive 10 120 topology subnet server 10.8.0.0 255.255.255.0 ifconfig-pool-persist ipp.txt push "dhcp-option DNS 8.8.8.8" push "dhcp-option DNS 8.8.4.4" push "redirect-gateway def1 bypass-dhcp" crl-verify crl.pem ca ca.crt cert server_7nXHxN25RjHzpvzv.crt key server_7nXHxN25RjHzpvzv.key dh dh.pem compress lz4-v2 push "compress lz4-v2" tls-server tls-auth tls-auth.key 0 cipher AES-256-CBC status /var/log/openvpn/status.log verb 3 |
修改客户端配置
在脚本的同一目录下会生成一个 .ovpn 文件,这是给客户端的配置文件。编辑它。
1 | nano client.ovpn |
1 2 3 4 5 6 7 8 9 10 11 12 13 14 15 16 17 18 19 20 21 22 23 24 25 26 27 28 29 30 31 32 | client proto udp remote 你的ip或域名 1194 dev tun resolv-retry infinite nobind persist-key persist-tun remote-cert-tls server verify-x509-name server_TP2kfJ5lwhmkDCEc name auth SHA256 auth-nocache cipher AES-128-CBC tls-client #注释掉下面两行 #tls-version-min 1.2 #tls-cipher TLS-DHE-RSA-WITH-AES-128-GCM-SHA256 setenv opt block-outside-dns verb 3 <ca> #此处省略 </ca> <cert> #此处省略 </cert> <key> #此处省略 </key> key-direction 1 <tls-auth> #此处省略 </tls-auth> |
保存之后将此文件上传到路由器,即可成功连接vpn。
查看服务端运行状态
1 | systemctl status openvpn@server |
CentOS 8 安装请移步 《CentOS 8 使用 Strongswan IPsec IKEv2 搭梯》
本文介绍使用 StrongSwan 搭建 VPN 的过程,适合有一定 linux 基础的用户。
本文使用的服务器
StrongSwan 是基于 OpenSource IPsec 的 VPN 解决方案,官方网站:https://www.strongswan.org/ ,如果无法访问请使用科学上网,原因你懂的。
StrongSwan 运行于 Linux 系统上,本文使用 CentOS 7 系统。
由于基于源码自行编译安装过于繁琐,这里只介绍使用 yum 的安装方式。
首先,配置 StrongSwan 的源,此软件已包含在 EPEL 源中,关于配置 yum 源,请参考 《CentOS 7 配置 LNMP + FTP 环境》文中的 “添加常用软件源” 部分。
安装 StrongSwan
1 | yum install strongswan |
启用开机启动
1 | systemctl enable strongswan |
StrongSwan IPsec IKEv2 连接需要用到服务器证书,用于验证服务器身份。由于自签发证书不受操作系统信任,我们需要申请 Let’s Encrypt 免费证书。
申请方式参考《CentOS 7 Nginx Let’ s Encrypt SSL 证书安装配置》, 申请的域名必须是明确的,不能用通配符证书代替。例如,vpn.xxx.com, 申请证书时,必须带上 -d vpn.xxx.com 参数。
安装证书
假设上一步我们申请的证书保存在 /etc/letsencrypt/live/xxx.com 中,xxx.com 是你申请证书使用的域名。
我们使用创建软连接的方式使用证书
1 2 3 4 5 6 | cd /etc/strongswan/ipsec.d ln -s /etc/letsencrypt/live/xxx.com/fullchain.pem ./certs/fullchain.pem ln -s /etc/letsencrypt/live/xxx.com/privkey.pem ./private/privkey.pem #下载 letsencrype 中间证书, 此步对于 windows 客户端连接至关重要。 wget https://letsencrypt.org/certs/lets-encrypt-x3-cross-signed.pem -O /etc/strongswan/ipsec.d/cacerts/lets-encrypt-x3-cross-signed.pem |
证书安装完成
修改 ipsec.conf 主配置文件
1 | nano /etc/strongswan/ipsec.conf |
删除原有内容,写入已下内容
1 2 3 4 5 6 7 8 9 10 11 12 13 14 15 16 17 18 19 20 21 22 23 24 25 26 27 28 29 30 31 32 33 | conn setup uniqueids = no conn %default compress = yes keyexchange=ike ike=aes256-sha256-sha1-modp2048-modp1024,3des-sha256-sha1-modp2048-modp1024! esp=aes256-sha256-sha1,3des-sha256-sha1! leftdns=8.8.8.8,8.8.4.4 rightdns=8.8.8.8,8.8.4.4 conn ikev2 dpdaction=clear dpddelay=60s rekey=no fragmentation=yes eap_identity=%identity left=%any leftid=这里用你申请证书时使用的域名,如“xxx.com” leftsubnet=0.0.0.0/0 leftauth=pubkey leftcert=fullchain.pem leftsendcert=always leftfirewall=yes right=%any rightid=%any rightsourceip=10.1.0.0/24 rightauth=eap-mschapv2 rightsendcert=never auto=add |
修改 charon.conf, 配置日志输出文件。
1 | nano /etc/strongswan/strongswan.d/charon.conf |
日志不是必要项,建议只用在调试配置时使用,配置正常后注释掉 filelog 节部分。
1 2 3 4 5 6 7 8 9 10 11 12 13 14 15 16 17 18 | charon { filelog { charon-debug-log { path = /var/log/charon_debug.log time_format = %b %e %T default = 2 mgr = 0 net = 1 enc = 1 asn = 1 job = 1 ike_name = yes append = no flush_line = yes } } #这里是其它设置...... } |
修改 ipsec.secrets , 增加 vpn 账户。
1 | nano /etc/strongswan/ipsec.secrets |
添加服务端证书私钥,新建用户账号。
1 2 3 4 5 | #这是申请的证书的私钥 : RSA privkey.pem #这是用户账号,每行一个账号,格式为 [账号 %any : EAP "密码"] user1 %any : EAP "password1" user2 %any : EAP "password2" |
1 | nano /etc/sysctl.conf |
增加下面的内容
1 2 3 4 5 | # VPN net.ipv4.ip_forward = 1 net.ipv4.conf.all.accept_redirects = 0 net.ipv4.conf.all.send_redirects = 0 net.ipv6.conf.all.forwarding=1 |
重新加载规则
1 | sysctl -p |
CentOS 7 默认使用 firewalld 防火墙, 有关 firewalld 的介绍请看这里。
允许 ‘AH’ 和 ‘ESP’ 身份验证协议和加密协议通过防火墙
1 2 | firewall-cmd --zone=public --permanent --add-rich-rule='rule protocol value="esp" accept' firewall-cmd --zone=public --permanent --add-rich-rule='rule protocol value="ah" accept' |
开放 ipsec 和相关端口
1 2 3 | firewall-cmd --zone=public --permanent --add-port=500/udp firewall-cmd --zone=public --permanent --add-port=4500/udp firewall-cmd --zone=public --permanent --add-service="ipsec" |
允许 ip 伪装
1 | firewall-cmd --zone=public --permanent --add-masquerade |
然后重新加载防火墙
1 | firewall-cmd --reload |
首先禁用 firewalld
1 2 | systemctl stop firewalld systemctl disable firewalld |
然后安装 iptables
1 2 | yum install iptables-services systemctl enable iptables |
配置 iptables
1 | nano /etc/sysconfig/iptables |
在默认内容基础上,添加几条规则(下面高亮的部分)。
1 2 3 4 5 6 7 8 9 10 11 12 13 14 15 16 17 18 19 20 21 22 23 24 25 | *nat :PREROUTING ACCEPT [0:0] :INPUT ACCEPT [0:0] :OUTPUT ACCEPT [0:0] :POSTROUTING ACCEPT [0:0] -A POSTROUTING -m policy --pol ipsec --dir out -j ACCEPT -A POSTROUTING -s 10.1.0.0/24 -o eth0 -j MASQUERADE COMMIT *filter :INPUT ACCEPT [0:0] :FORWARD ACCEPT [0:0] :OUTPUT ACCEPT [0:0] -A INPUT -m state --state RELATED,ESTABLISHED -j ACCEPT -A INPUT -p icmp -j ACCEPT -A INPUT -i lo -j ACCEPT -A INPUT -i eth0 -j ACCEPT -A INPUT -p tcp -m state --state NEW -m tcp --dport 22 -j ACCEPT -A INPUT -p ah -j ACCEPT -A INPUT -p esp -j ACCEPT -A INPUT -p udp -m udp --dport 500 -j ACCEPT -A INPUT -p udp -m udp --dport 4500 -j ACCEPT -A INPUT -j REJECT --reject-with icmp-host-prohibited -A FORWARD -i eth0 -m policy --pol ipsec --dir in -j ACCEPT -A FORWARD -j REJECT --reject-with icmp-host-prohibited COMMIT |
重新加载 iptables 规则
1 | systemctl restart iptables |
1 | systemctl restart strongswan |
开始->设置->网络和Internet->vpn->添加vpn连接
添加完成后点击“更改适配器选项”
在vpn连接项点右键,属性->网络
双击 ipv4 ,点击“高级”
勾选“在远程网络上使用默认网关”, 取消“自动跃点”,手动填写跃点数为“10”(当自动跃点无法上网时才设置手动跃点)。如何确定跃点数,请看下面内容。
确定后连接 vpn 即可。
确定跃点数
因为 win10 系统的问题,经常会出现vpn连接能连上,就是打不开网页的情况,这是因为“本地连接”的优先级高于“vpn”的优先级,导致所有的请求优先使用“本地连接”的dns去解析域名,由于我们国家坚持推行使用社会主义特色的dns,所以某些域名解析会返回无效或错误的ip地址,这就导致我们无法正常访问网站!跃点数就是设定优先级用的。
我们需要做的就是让 “vpn 连接” 的跃点数小于 “本地连接” 的跃点数。
断开vpn, 打开 PowerShell 窗口,输入下面命令。
1 2 | #查看接口 Get-NetIPInterface -AddressFamily ipv4 |
第一列表示当前接口的索引号,第二列是名称,InterfaceMetric 列即接口的跃点,我的本地连接名是 WLAN, 跃点是35。
查看“本地连接”网卡的跃点数为 35,因此上一步中设置的跃点数只要小于35即可(跃点数越小优先级越高),所以我们设置为10。
“设置->VPN->添加配置”, 选 IKEv2
描述: 随便填
服务器: 填url或ip
远程ID: ipsec.conf 中的 leftid, 如 “xxx.com”
用户鉴定: 用户名
用户名: EAP 项用户名, 如 “user1”
密码: EAP 项密码, 如 “password1”
原理同 ios, 我没有 mac 做验证。
需下载安装客户端程序,前往官网下载
最新版 apk 程序
当前最新 .net core 版本为 2.1
打开 .net core 下载页面,https://www.microsoft.com/net/download/linux ,页面包含 .net core sdk 及 .net core runtime 两个安装包。
如果需要在 linux 上进行开发,要安装 .net core sdk 版本,不需要开发推荐安装 .net core runtime 版本。
点击 install .NET Core 2.1 Runtime ,进入下载页面,在下拉框中选择 Centos。
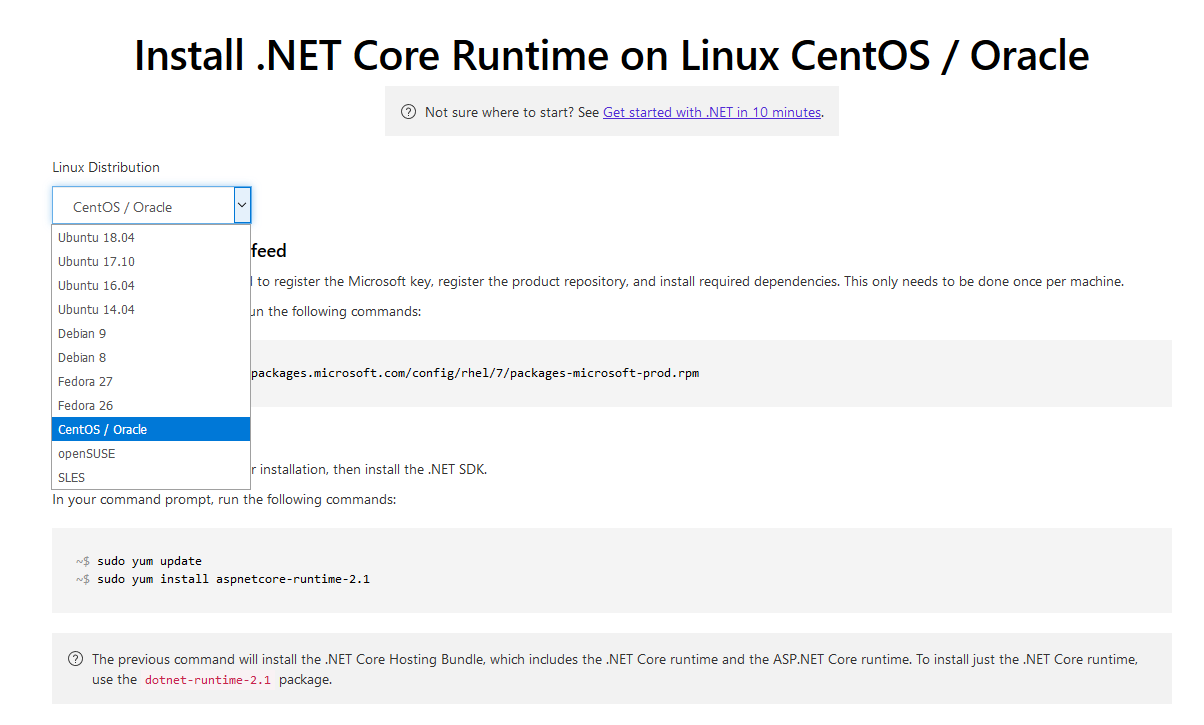
按提示输入以下命令
1 2 3 4 5 6 7 | rpm -Uvh https://packages.microsoft.com/config/rhel/7/packages-microsoft-prod.rpm #如果需要同时支持运行 asp.net core 和 .net core app ,则运行这条命令 yum install aspnetcore-runtime-2.1 #如果只要需运行 .net core app, 不需要 asp.net core ,则运行这条命令 yum install dotnet-runtime-2.1 |
安装完成后运行 dotnet –info 查看版本信息
Shadowsocks 需要 python 运行.
1 2 3 4 5 6 7 8 9 10 11 12 | #安装 python setup tools yum install python-setuptools #安装pip easy_install pip #升级 pip pip install --upgrade pip #安装git yum install git #安装 shadowsocks, 当前版本为 3.0 pip install git+https://github.com/shadowsocks/shadowsocks.git@master #升级 shadowsocks pip install --upgrade git+https://github.com/shadowsocks/shadowsocks.git@master |
1 | nano /usr/lib/systemd/system/shadowsocks.service |
写入下面的内容
1 2 3 4 5 6 7 8 9 10 11 12 13 14 | [Unit] Description=Shadowsocks Server Documentation=https://github.com/shadowsocks/shadowsocks After=network.target remote-fs.target nss-lookup.target [Service] Type=forking #设置启动时的配置文件,根据自己的需求改. ExecStart=/usr/bin/ssserver -c /usr/share/nginx/etc/shadowsocks.json -d start ExecReload=/bin/kill -HUP $MAINPID ExecStop=/usr/bin/ssserver -d stop [Install] WantedBy=multi-user.target |
保存退出
添加配置文件
1 2 | #改为上一步中的路径, 确保各级目录存在 nano /usr/share/nginx/etc/shadowsocks.json |
写入配置内容
1 2 3 4 5 6 7 8 9 10 11 12 13 14 15 | { "port_password": { "8388":"密码1", "端口2":"密码2" }, "_comment": { "8388":"注释1,日志中标识用户用的", "端口2":"注释2" }, "timeout":300, "method":"aes-256-gcm", "fast_open": false } |
保存退出
启动服务
1 2 | systemctl enable shadowsocks systemctl start shadowsocks |
配置完成
记得在防火墙中开放相应端口
首先下载客户端, 虽然原作者删除了服务端代码, 但他仍在开发客户端.
下载后解压, 配置服务器参数即可使用, 方法就不多说了.
1 2 3 4 5 | #安装 rpm 包工具和依赖项 yum install rpmdevtools pcre-devel gcc make #生成 rpm build 目录树 rpmdev-setuptree |
这里以 stunnel 这个软件为例, 官网为 https://www.stunnel.org
1 2 3 4 5 6 7 8 9 10 11 12 13 14 15 16 17 18 | cd /root #下载最新版源码, 放到 /root/rpmbuild/SOURCES 文件夹, 注意 SOURCES 必须大写 wget https://www.stunnel.org/downloads/stunnel-5.22.tar.gz -O /root/rpmbuild/SOURCES/stunnel-5.22.tar.gz #解压单个 stunnel.spec 文件 tar --strip-components 2 -xvf /root/rpmbuild/SOURCES/stunnel-5.22.tar.gz stunnel-5.22/tools/stunnel.spec #转到 SOURCES 文件夹 cd /root/rpmbuild/SOURCES #将 stunnel.spec 文件移动到 /root/rpmbuild/SPECS 文件夹 mv stunnel.spec /root/rpmbuild/SPECS #执行创建命令, 将在 /root/rpmbuild/RPMS 文件夹下生成 rpm 包 rpmbuild -bb /root/rpmbuild/SPECS/stunnel.spec --define "release 1" #查看生成文件 tree /root/rpmbuild/RPMS/ |
3. 从 RPM 包安装
1 2 3 4 5 6 7 8 | #使用 rpm 命令安装, -i 表示安装, -v 显示详细信息 rpm -iv /root/rpmbuild/RPMS/x86_64/stunnel-5.22-1.x86_64.rpm #查看安装目录 rpm -ql stunnel #卸载 rpm -ev stunnel |
下面介绍 SNMP 服务的安装配置. 官网: http://www.net-snmp.org/
1 2 3 4 5 6 7 8 | yum install net-snmp #设置开机启动 systemctl enable snmpd systemctl start snmpd #查看当前版本, 这里是5.7.2 snmpd -v |
SNMP支持不同的验证机制,这取决于不同的SNMP协议版本,监控宝目前支持v2c和v3两个版本, 我们使用 v3.
首先停止 snmp 服务
1 | systemctl stop snmpd |
编辑配置文件
1 | nano /etc/snmp/snmpd.conf |
在文件末尾添加如下内容
1 2 3 4 5 | #启用只读 v3 用户 rouser user1 auth #创建用户 createUser user1 MD5 password |
在CentOS 6版本,时间设置有date、hwclock命令,从CentOS 7开始,使用了一个新的命令timedatectl。
1.1 GMT、UTC、CST、DST 时间
如果已经将PHP更新到5.2.x,可以自行安装phpMyAdmin最新版3.x。
phpMyAdmin是一款MySQL数据库web化的管理工具。
1 | yum install phpMyAdmin |
现在我们配置下phpMyAdmin。我们改下Apache的配置文件,使的phpMyAdmin不单单是本机访问。 如下所示:
1 | vi /etc/httpd/conf.d/phpMyAdmin.conf |
注释或删除本地ip限制. 如下
1 2 3 4 5 6 7 8 9 10 11 12 13 14 15 16 17 18 19 20 21 22 23 24 25 26 27 28 29 30 31 32 33 | <Directory /usr/share/phpMyAdmin/> <IfModule mod_authz_core.c> # Apache 2.4 <RequireAny> #Require ip 127.0.0.1 Require ip ::1 </RequireAny> </IfModule> <IfModule !mod_authz_core.c> # Apache 2.2 Order Deny,Allow Deny from All Allow from All Allow from ::1 </IfModule> </Directory> <Directory /usr/share/phpMyAdmin/setup/> //这一段是web配置工具的访问权限,如果不使用,可以不修改. <IfModule mod_authz_core.c> # Apache 2.4 <RequireAny> #Require ip 127.0.0.1 Require ip ::1 </RequireAny> </IfModule> <IfModule !mod_authz_core.c> # Apache 2.2 Order Deny,Allow Deny from All Allow from All Allow from ::1 </IfModule> </Directory> |
然后修改里面的配置文件:
1 | vi /usr/share/phpMyAdmin/config.inc.php |
1 2 | $cfg['blowfish_secret'] = ‘ ‘ //单引号里面随便填一个字符串。 $cfg['Servers'][$i]['auth_type'] = 'cookie'; //这里使用 cookie 作为验证方式. |
重启Apache:
1 | service httpd restart |
然后,你就可以通过 http://domain.com/phpmyadmin/ 访问phpMyAdmin了。
需要注意的是, 登录的用户名是你的 mysql 数据库的帐号和密码, phpMyAdmin 使用的是 “帐号@localhost” 帐号, 如果你的帐号密码为空是会被拒绝登入的, 所以要记得给你的帐号加上密码.
1 | yum install vsftpd |
编辑配置文件
1 | vi /etc/vsftpd/vsftpd.conf |
我们这里使用虚拟用户的形式, 配置如下.
1 2 3 4 5 6 7 8 9 10 11 12 13 14 15 16 17 18 19 20 21 22 23 24 25 26 27 28 | anonymous_enable=NO local_enable=YES write_enable=YES local_umask=022 dirmessage_enable=YES xferlog_enable=YES xferlog_file=/var/log/vsftpd.log connect_from_port_20=YES ftpd_banner=Welcome to My FTP Server ^_^. chroot_local_user=YES ls_recurse_enable=YES listen=YES pam_service_name=vsftpd userlist_enable=NO tcp_wrappers=YES one_process_model=no #以下是手动添加的 pasv_min_port=30000 pasv_max_port=35000 allow_writable_root=YES guest_enable=YES guest_username=root virtual_use_local_privs=YES user_config_dir=/etc/vsftpd/user_conf |
建立虚拟用户名单文件:
1 | vi /etc/vsftpd/ftpuser.txt |
内容如下:
1 2 3 4 | ftp1 1234 ftp2 5678 |
格式很简单:“一行用户名,一行密码!”。
1 2 | db_load -T -t hash -f /etc/vsftpd/ftpuser.txt /etc/vsftpd/users.db chmod 600 /etc/vsftpd/users.db |
1 | vi /etc/pam.d/vsftpd |
将原有内容注释或删除, 将以下内容加入到文件中.
32位系统:
1 2 3 | #db=/etc/vsftpd/users , 这里的users 是上一步创建的数据库名, 去掉后缀. auth required /lib/security/pam_userdb.so db=/etc/vsftpd/users account required /lib/security/pam_userdb.so db=/etc/vsftpd/users |
64位系统:
1 2 3 | #db=/etc/vsftpd/users , 这里的users 是上一步创建的数据库名, 去掉后缀. auth required /lib64/security/pam_userdb.so db=/etc/vsftpd/users account required /lib64/security/pam_userdb.so db=/etc/vsftpd/users |
每个虚拟用户必需有一个同用户名相同的配置文件, 这个文件里保存着对这个用户的个性化配置, 里面的属性可以是 vsftpd.conf 中的任何属性.
创建虚拟用户配置文件目录, 这个目录是在 vsftpd.conf 中 user_config_dir= 配置的.
1 | mkdir /etc/vsftpd/user_conf |
创建用户配置文件,以用户名命名.
1 | vi /etc/vsftpd/user_conf/ftp1 |
1 2 3 4 5 6 | local_root=/var/www/html idle_session_timeout=600 data_connection_timeout=120 max_clients=10 max_per_ip=5 local_max_rate=50000 |
1 | service vsftpd start |
设置开机启动
1 | chkconfig --level 3 vsftpd on |
7.允许通过防火墙